Tuesday, December 24, 2013

Dog Treats

I can't believe today is Christmas Eve!  Everything is happening to fast BUT, I'm happy to say, I am done with shopping and baking.  I am one of those people that leaves it to the last minute, but this year I am one day early! Yay me!  I even had time to bake some doggie treats for dog gifts.
Pumpkin & Peanut Butter Dog Treats:
adapted from here

1 cup pumpkin puree
3 tablespoons creamy peanut butter
2 eggs
2 1/2 cups whole wheat flour
1/2 teaspoon salt
1/2 teaspoon ground cinnamon

Preheat oven to 350 degrees.  Prepare cookie sheet with either Silpat or parchment paper.

Mix all ingredients together in blender.  The dough will come out dry and stiff, but you should still be able to work with it.  Roll the dough into 1/2 inch thickness (the thinner they are the crunchier they will be!) and use cookie cutters to cut out pieces.  Place on prepared cookie sheet and bake for 40 minutes until cookies are hard.

And done!  I added a cute ribbon to them and they are ready to go in a gift bag...
Luna was my taster and she gave the thumbs...umm, I mean paws up!
She liked the cookie so much she wouldn't hold still for the pic!
Until next time!


Thursday, December 19, 2013

"Ugly Christmas Sweater" Ornaments

When I saw this tutorial from American Felt and Craft blog I couldn't resist.  I had to make these super "Ugly Christmas Sweater" ornaments.

Aren't they cute! Umm...I mean ugly...nah, they are cute!  I spent Sunday afternoon making them.  Plus, I didn't have to buy any supplies as had all on hand. Bonus!  This one is my favorite...
Click here for the full tutorial and template.

Until next time!
Luna wasn't in the mood for taking pictures.


Tuesday, December 17, 2013

Vivian Luna Accessories

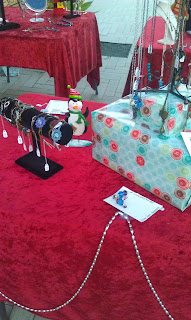
I meant to post this last week but time got away from me.  I still can't wrap my brain the fact that Christmas is next week!  I am SO not ready!  Anyway, on December 7th I had an opportunity to sell my jewelry at the first annual German Christmas Market in Anaheim.  I only had a week to prepare but knew I had to go for it.  I am so glad that I did!  It was a fun and successful day!  It was amazing to me that strangers were going to be wearing my jewelry!  I loved it! Here are photos of my set up....


I hope that the new year brings more opportunities such as this one.  For now I have to get busy taking photos and putting stuff on Etsy.

Until next time!

Wednesday, November 13, 2013

Bullet Earrings

I had seen a similar pair of earrings somewhere, but I can't remember where.  I instantly liked them and wanted to recreate them.  I recall they were in gold.  I don't wear gold, but I liked the style.  I had silver bullet charms so I knew I'd be able to make a similar pair in silver.

Supplies Used:
3 different types of chains -- cut to however long you want your earrings to be (the longest hanging chain on mine was 6" so when you connect it ends up hanging about 3" long)
Ear wires
2 pieces of  wire about 3" long
6 jump rings
Tools to connect pieces together

How to:
1.  Bend two pieces of wire as so...
2.  Add chains to either side with jump ring...
So it ends up looking like this...
3. Add bullet charm to shortest chain using a jump ring...
4.  Add ear wires and done...
Until next time!
Pretty Luna!

Wednesday, November 6, 2013

Bracelet from a Ring

As I stated before here I purchased a lot of charms, but I also purchased a lot of these...


After I made several rings I wanted to use the filigree part for something else, but that sucker would not come off!  I got frustrated and straightened out the ring part of it.  I left it like that for several days and when I looked at it again I thought, well, maybe a bracelet??? And this is what I came up with...

I glued a rose to the filigree part, bent the ends and added chain and a closure and done!
Here it is with another one I made.  This one I painted the filigree part before I added the flower.

Until next time!


Sunday, November 3, 2013

"Dia de Los Muertos" Mask

I meant to post this one Friday night, but ended up going out so didn't get a chance.  Then I remembered yesterday but...well, no excuse I just didn't.  So, it's a bit late as "Dia de Los Muertos" (Day of the Dead) already passed, but I feel skull masks can be displayed all through the year.

It started off like this...
OK, so not with the black. I was initially going to paint it with black but change my mind.
And with some paint it ended up like this...

I bought the blank skull mask at Michaels for like a $1 and I already had all the paint.

You can't really see it in the photo, but I added touch of lace to the edge of the mask. 

Until ned time!


Thursday, October 31, 2013

Halloween Bib Necklace

Happy Halloween!!!!  I must admit Halloween has never been one of my favorite holidays.  I just never really got into it.  OK, full confession here...I didn't even like going "trick or treating" as a child. For reals! BUT, as I got older I got more into it even dressing up now and then and enjoying a Halloween party here and there.  AND, I always made sure Vivian dressed up for Halloween and went "Trick or Treating" (I think this year she is going as a Volleyball player...I zombie Volleyball player), as she really liked dressing up and, of course, all the candy. And yes, I've even dressed up Luna for Halloween. 

OK, so back to crafting...I made a Halloween bib necklace using Duck tape.  Duck tape has really evolved from the gray tape of yesteryear (or something like that).  We were fortunate to receive 3 different designs during SoCal Social.  The cute...um I mean spooky...spider design was my favorite.


Supplies, I used...plus scissors, glue and hole punch.


First I cut out a pattern on cardboard box (used the lid of one of my shoe boxes I was going to throw away). I then covered it with the Duck tape, added black felt to the back with glue, then went crazy with the bling, punched to holes at the top for the ribbon and done! 

And, since I was having so much fun, I made earrings to match. I know, I'm way too cool!
Until next time!
She's all set for Halloween!